Create and validate your first plan
For: first-time APS users
Time: 10–15 minutes
Outcome: a lint-clean plan with one ready work item selected by the CLI
Before you begin
You need:
- macOS, Linux, or Windows;
- a terminal and internet access for installation; and
- a project directory where you may create planning files.
APS does not require an account or a hosted service.
1. Install APS
macOS or Linux
curl -fsSL https://raw.githubusercontent.com/eddacraft/anvil-plan-spec/main/scaffold/install | bash
Windows PowerShell
& ([scriptblock]::Create((irm https://raw.githubusercontent.com/eddacraft/anvil-plan-spec/main/scaffold/install.ps1)))
In an interactive terminal, the installer installs the native binary and opens
the aps init wizard. Choose the solo profile and single-project shape
for this tutorial. Accept the default paths. Tool integrations are optional.
If you closed the wizard, run aps init from the project root to reopen it.
2. Verify the installation
Open a new terminal if the installer changed your PATH, then run:
aps --version
Success looks like aps 0.6.0 or a newer version.
Confirm that the project now contains plans/index.aps.md,
plans/aps-rules.md, and .aps/config.yml.
3. Write a small index
Replace plans/index.aps.md with this content:
# Todo service

## Overview

A small service plan used to learn APS.

## Problem & Success Criteria

**Problem:** Add one health endpoint.

**Success Criteria:**

- [ ] The endpoint returns HTTP 200.

## Modules

| Module                        | ID   | Owner | Status | Priority | Tags | Dependencies |
| ----------------------------- | ---- | ----- | ------ | -------- | ---- | ------------ |
| [todo](./modules/todo.aps.md) | TODO | @you  | Ready  | high     | api  | —            |
The index explains the whole plan. It does not authorise implementation by itself; the linked module owns executable work.
4. Add the first module
Create plans/modules/todo.aps.md with the following content. Replace
YYYY-MM-DD with today's date before continuing.
# Todo service module

| ID   | Owner | Priority | Status |
| ---- | ----- | -------- | ------ |
| TODO | @you  | high     | Ready  |

## Purpose

Add the first observable service endpoint.

## In Scope

- A health endpoint.

**Last reviewed:** YYYY-MM-DD

## Work Items

### TODO-001: Add the health endpoint

- **Status:** Ready
- **Intent:** Add a health endpoint for service checks.
- **Expected Outcome:** `GET /health` returns HTTP 200.
- **Validation:** `npm test`
Use a validation command that exists in your project. The example uses
npm test; change it if your project uses another command.
5. Validate the plan
From the project root, run:
aps lint
Success ends with:
2 files checked, no issues
Fix every error before proceeding. Warnings identify drift or ambiguity worth reviewing even when the command exits successfully.
6. Select the ready work
aps next
Success names TODO-001, its module, its status, and its file. You now have a
validated plan and an authorised next outcome; no implementation has started.
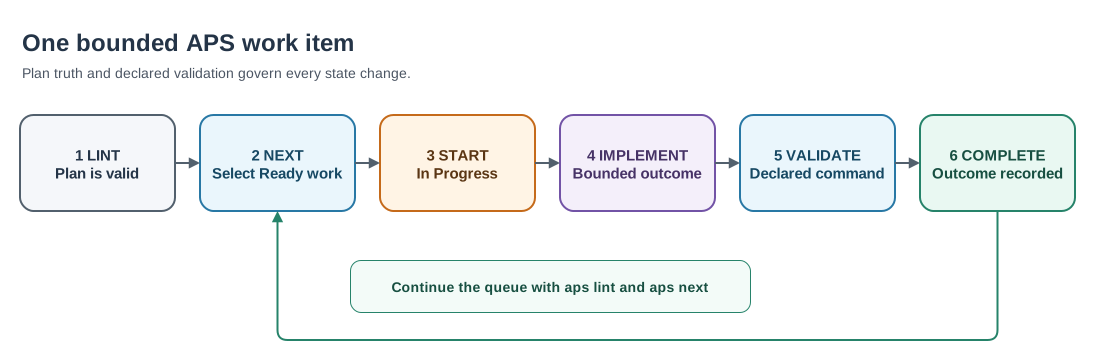
Work-item lifecycle
A full APS work item continues from valid plan truth: select Ready work, start
it as In Progress, implement the bounded outcome, run its declared validation,
record completion, and then continue the queue.
Next step
Continue with the day-to-day workflow to claim the item, run its validation, and record completion.